
This tutorial shows you how to make a grungy dirty surface from scratch without having to scan a surface to begin with. Like the grunge brush tutorial below, there are a lot of steps involved – don’t despair its not overly complicated – it just means there are lots of ways to modify and improvise to make even more interesting textures.
1. Make a new file 5 inches x 7 inches x 300 p.p.i
2. Change your colos to the default colors (black foreground, white background) by typing D on your keyboard.
3. Go to the FILTER menu > RENDER > DIFFERENCE CLOUDS. Apply this at least 2 times. Difference clouds uses the blending mode of difference as it applies the cloud filter producing otherwordly results. After applying the filter if you go back to the FILTER menu DIFFERENCE CLOUDS will be listed at the top.
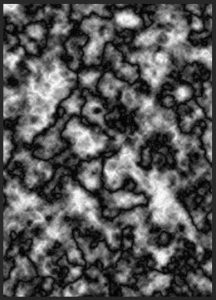
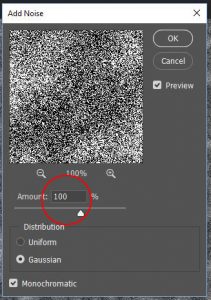
4. Go to the FILTER menu > NOISE > ADD NOISE, set the amount to 100%, distribution to Gaussian using Monochromatic (black and white) noise.
5. Go to the FILTER menu > STYLIZE > DIFFUSE and choose Normal as your diffusion method.

6. Go to the FILTER menu > BLUR > MOTION BLUR, set the angle to 0 degrees and distance to 200.
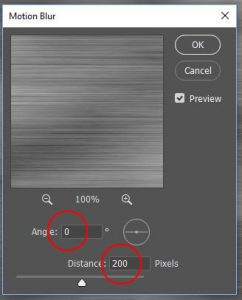
7. Go back to the FILTER menu > BLUR > MOTION BLUR, set the angle to 90 degrees and distance to 200.

8. Go to the FILTER menu > NOISE > ADD NOISE, set the amount to 20%, distribution to Gaussian using Monochromatic (black and white) noise.

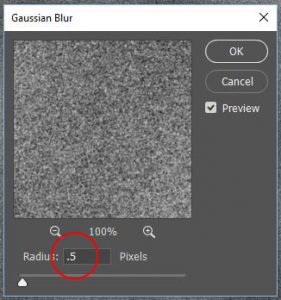
9. Go to the FILTER menu > BLUR > GAUSSIAN BLUR and set the radius to 0.5 pixels.
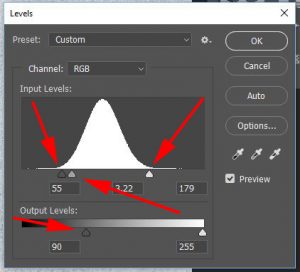
10. Go to the IMAGE menu > ADJUSTMENTS > LEVELS and boost the contrast by moving the black and white points toward the center, shift gamma (the gray point) to the left, and in output levels clip the blacks to gray by sliding the black slider towards the center.
11. Make a new layer and go the EDIT menu > FILL and use white as your content.

12. Go to the FILTER menu > RENDER > DIFFERENCE CLOUDS. Apply this 8-10 times.
13. Go to the FILTER menu > NOISE > ADD NOISE, set the amount to 20%, distribution to Gaussian using Monochromatic (black and white) noise.

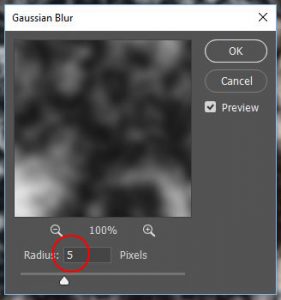
14. Go to the FILTER menu > BLUR > GAUSSIAN BLUR and set the radius to 5 pixels.
15. Go to the IMAGE menu > ADJUSTMENTS > LEVELS and in output levels clip whites to gray by sliding the white slider towards the center.

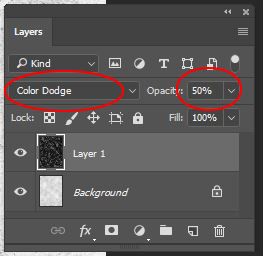
16. Change the blend mode to color dodge at 50% opacity.
17. Make a levels adjustment layer – shift white towards center, in output levels clip blacks to gray at level 128 (nothing will be darker the 50% gray.)

18. Make a solid color adjustment layer, fill with color #a9a9a9 and change the blending mode to Multiply at 100%

19. Make a gradient fill adjustment layer. To add more options go to the WINDOW menu > GRADIENTS to open the gradients panel. At the drop down menu (top right) choose “Legacy Gradients” When you use the gradient fill you will now see a “legacy gradients” folder in the drop down list. Click on that and the photographic toning presets are there. Choose one of the Sepia photographic toning gradients.

Change the gradient style to linear, the angle to -90 and the scale to %150. Click OK

20. Change the blending mode of the gradient fill layer to Color

21. Make a new layer go to the EDIT menu >FILL and fill with white.
22. Go to the FILTER menu > RENDER > DIFFERENCE CLOUDS. Apply this 8-10 times.
23. Go to the FILTER menu > NOISE > ADD NOISE, set the amount to 100%, distribution to Gaussian using Monochromatic (black and white) noise.
24. Go to the FILTER menu > BLUR > GAUSSIAN BLUR and set the radius to 1 pixel.

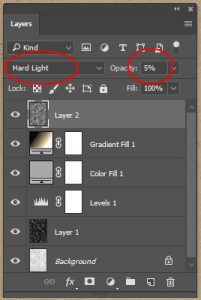
24. Change the blending mode to Hard Light at 5%
25. Save your file as Grunge Texture.psd
Photoshop, Illustrator and InDesign Tutorials

Pingback: A Grunge Portrait in Photoshop | Nick Cassway's designBLOG