

This tutorial will take you through the steps of using your Illustrator graphic in Photoshop. These steps will allow you to make a black and white version, a reverse-out version as well as a watermarked version of the logo and keep it linked to the original Illustrator file. Part 1 assumes the logo is a one-color logo where “blank” areas of the logo are transparent and not filled in with a white fill. Part 2 will address two-color or unfinished vector graphics.
Download this graphic or use your own. (for Mac users – Safari doesn’t seem to like Illustrator files, I recommend Chrome or Firefox)
1. Place your Illustrator Logo into an RGB photoshop file. For my example, I am using a 5″ x 5″ x 150 pixel per inch file. Go to the FILE menu > PLACE LINKED. Use place linked so that if changes need to be made in the original Illustrator logo it will automatically update the Photoshop file once it is saved. Crop it to Bounding Box so that only the graphic is placed and not the full page. Scale it to an appropriate size.

2. To make a Black and White Version of the logo, click on the Fx icon at the bottom of the Layers panel and select Color Overlay.

Change the color to Black with a blending mode of Normal and an opacity of 100%.

3. Save your file as BWLogo.PSD (FILE menu > SAVE AS) but keep the file open.

4. To make a reverse-out logo (where the logo is white on a background of your brand color) double click the Color Overlay effect and change the color to White with Normal as the blending mode at 100%. [Note: The screen will be blank momentarily until we change the background color]

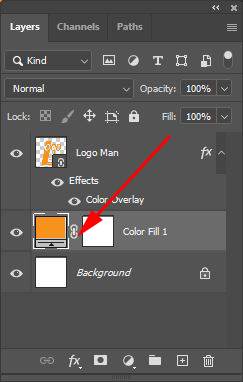
4. Go to the Layer Adjustments Icon at the bottom of the Layers Panel and select Solid Color.

Change the color to the color of your logo – for my example, I am using #f7931d

5. Drag the Solid Color layer below the logo layer.
Save your file as Reverseout Logo.PSD (FILE menu > SAVE AS) and keep the file open.

6. To make a watermark version of the logo, change the opacity of the Logo layer to between 60% and 75%.

7. Go to the EDIT menu > FREE TRANSFORM and scale the graphic down and place it in the bottom right corner. Double click on it to set the transformation.

8. Go to the FILE menu > PLACE EMBEDDED and place a photograph of your choice – scale it so that it fits the entire canvas. Double click on it to set the transformation.

9. Drag the placed photo layer below the logo layer.

Save your file as Watermark Logo.PSD

NOTE: Because your logo was initially placed in as linked it retains a connection to the Illustrator file – this means that if you make a change to the Illustrator file and save it, it will immediately update your Photoshop file (if the file is still open). If you have closed your Photoshop file and reopened it after you made your changes in Illustrator, you will see a yellow warning triangle inside the logo thumbnail in the Layers Panel – to update the logo go to the LAYER menu > SMART OBJECT > UPDATE MODIFIED CONTENT.
