To provide yourself some flexibility in InDesign with scanned graphics – changing colors to match swatches, using graphics as knockouts etc.. graphics need to be converted to a superblack – or in this case a super-duper black – a CMYK file with all levels of ink at 100%
1. Import graphic via scan/download etc.
2. Adjust the levels the on scan if necessary by dragging the black and white points towards the center and making the image high contrast – meaning there are distinct black and white areas and shades of gray are minimized. (For a downloaded QR code this will not be necessary) IMAGE menu > ADJUSTMENTS > LEVELS

3. Convert the file to CMYK – IMAGE menu >MODE>CMYK.
4. Select all SELECT menu>ALL or apple/cntrl + A and then cut (EDIT menu > CUT or apple/cntrl + X.)
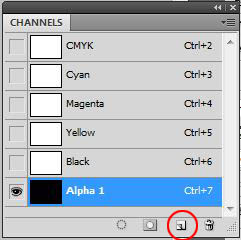
5. Create a new alpha channel and paste the graphic into the new alpha channel (EDIT menu > PASTE or apple/cntrl + V.) Ensure that Alpha 1 is the current editing layer (it will be highlighted in light blue)

6. Invert the graphic within the new alpha channel – IMAGE menu > ADJUSTMENTS > INVERT.
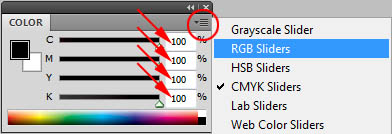
7. Create the super-duper black. Open the Color Palette (WINDOW menu > COLOR) Change the sliders to CMYK – click on the palette menu and select CMYK SLIDERS. Slide all values to 100%

8. Select the CMYK channel as the current editing space (CMYK will be highlighted in blue in the channels palette.) Load the alpha channel as a selection – go to the SELECT menu > LOAD SELECTION and select Alpha 1.

9. Fill the selection with the foreground color. EDIT menu > FILL > use FOREGROUND COLOR.
10. Save your file.
11. Place your graphic into an InDesign document. FILE menu > PLACE and scale to a desired size.
12. Change the color of the content frame to a swatch color (you won’t see a difference at this point because the graphic still has a white background)
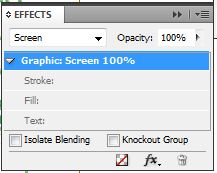
13. Open the effects palette – WINDOW menu > EFFECTS, select the graphic with the white arrow and in the effects palette change the blending mode to SCREEN. This will keep the white opaque and make the super-duper black assume the color of the content frame’s fill.

14. For white lines to appear for your graphic (as in the image at the top of this post), DO NOT INVERSE the alpha channel in step 6

One response to “Photoshop/InDesign Tutorial – Create a super-duper black graphic”