 The tutorial below describes how to blend two images together, a useful little trick for making montages of many images.
Here’s how to do it.
1. Open two (or more) images in Photoshop
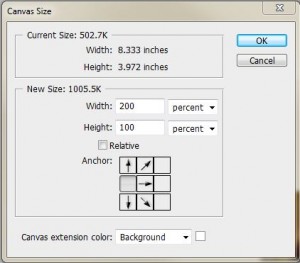
2 Go to IMAGE menu > CANVAS SIZE. Expand the canvas size for the file that will have the picture at the furthest left. Lock the image to the left side and change the horizontal units to percentage and change the width to at least 200% (you will crop this at the end) if you are using more than two pictures change the percentage to something larger (you can always expand the canvas later)

3. Drag the 2nd picture to this file – resize if necessary. If your files have opened in Tabs (as is the default these days in Photoshop) and you are finding it hard to drag one file into another, go to the WINDOW menu > ARRANGE > FLOAT ALL IN WINDOWS. This will allow you to move the windows around easier.
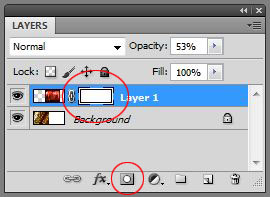
4. In layer 2, temporarily change the opacity to %50 – you will do this so you can see the where the images overlap. Slide the left side of layer 2 over the right side of layer 1 to a desired position.

Let the cross fading begin.
5. In layer 2, create a layer mask.

6. Select the gradient tool
![]()
and select the black to white gradient. Ensure the mode is set to normal, opacity is set to 100% and make sure reverse is not checked.
![]()
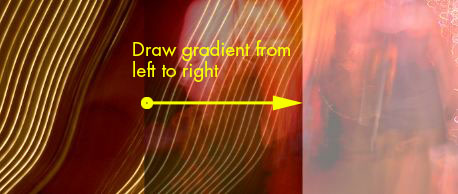
6. In the layer mask, draw the gradient from the left side of the overlap to the right.

NOTE: make sure you are doing this in the layer mask (the new thumbnail to the right of the layer 2 thumbnail) you will know you are in the mask as opposed to the layer if the black brackets are around its corners.
7. Change the opacity of layer 2 back to 100%, crop the image if necessary.
ANOTHER NOTE: With the mask linked to the layer (you will see a chain icon between the two) you can continue to reposition the overlap and maintain the fade out on the left hand side of layer 2.
HOW THIS WORKS: A layer mask is a way of hiding or revealing parts of layer. Areas of the mask that are black will hide the content whereas white will not hide at all, shades of gray will hide based on its luminosity level. The smooth transition of the gradient creates a seamless fading effect.

3 responses to “Photoshop Tutorial – Photoshop Cross Fader”