

With this tutorial, you will create a layout that utilizes a modular grid. A modular grid uses consistent horizontal and vertical divisions creating modules that can be used for placement of text, pictures or graphics. This grid is highly flexible and modules can be combined and divided to further design possibilities.
The content of this layout is 10 design principles that all designers should consider; make sure to read through them, they are extremely informative.
1. Create a new document using a standard letter size page – InDesign typically uses points and picas and will display the dimensions of the page as 51p0 x 66p0. 6p0 = 1″, so if you divide the dimensions by 6 you get 8.5″ x 11″. The document will have 3 pages but we will only work on pages 2 and 3. Use the facing pages option so that you will have a left and right-hand side of the layout. Set the margins to 4p6 (3/4″) for the top and 6p0 (1″) for the bottom. Because this layout uses facing pages there is no left and right, instead, there is an inside (next to the spine) and outside (where your hands hold the magazine) set the inside to 6p0 and the outside to 4p6. Finally, change the number of columns to 4 with a gutter (the space between the gutters) to 1p0 (12pts or 1/6″) Click CREATE.

2. Go to the LAYOUT menu > CREATE GUIDES and make 3 row guides with a width of 2p0, fit the guides to inside the margins. Click OK.

3. Go to the VIEW menu > GRID & GUIDES and make sure SNAP TO GUIDES is checked.

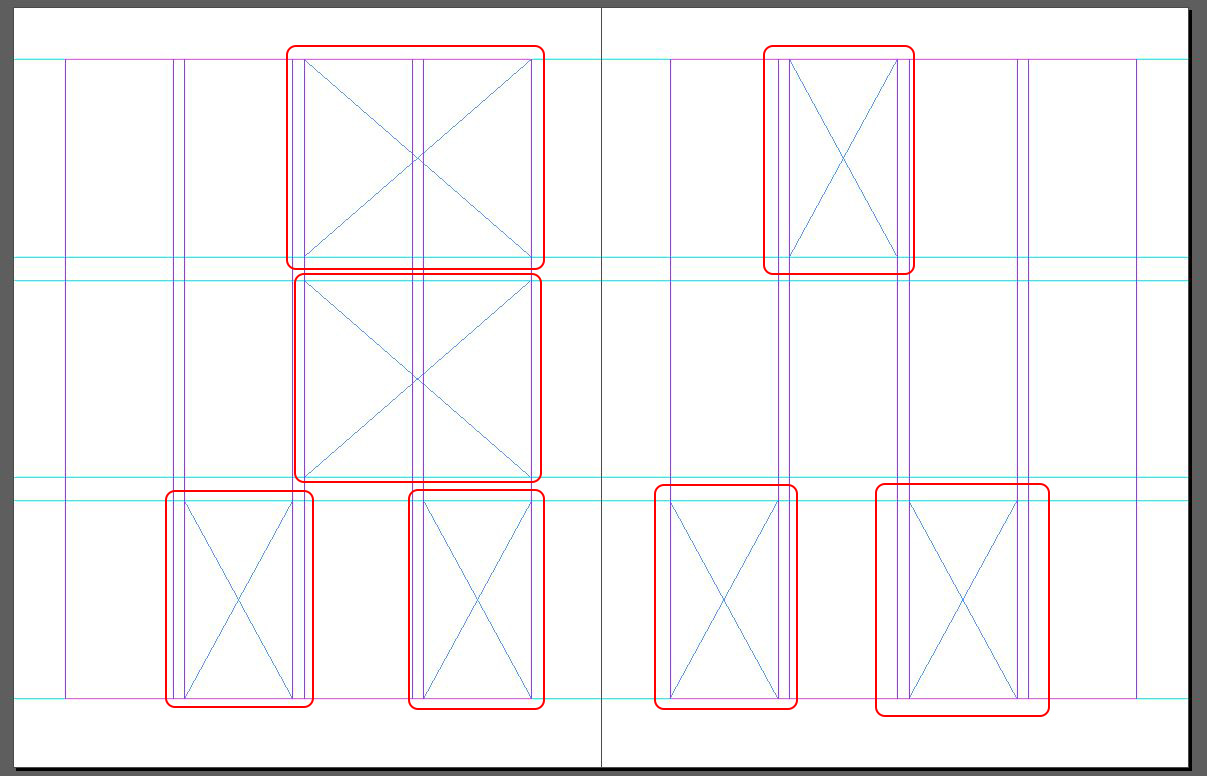
Select the rectangular content frame tool![]() from the toolbar and create frames in the areas designated in the illustration below.
from the toolbar and create frames in the areas designated in the illustration below.
You want to ensure that the frames snap to all of the guides to maintain cleanliness and a sense of order – zoom into the layout to check all of the edges.
4. A modular grid has the advantage of being broken up into all sorts of units that may not have been set up from the beginning, we will do this with the next frame. Draw a content frame that spans three columns on the right hand page in the middle row.

5. The next step is to divide the new frame in half to make two copies AND make a 1p0 gutter. For this, we’ll use a little InDesign math. With the newest frame selected open the TRANSFORM panel – WINDOW menu > OBJECT & LAYOUT > TRANSFORM. Set the Reference Point to the left-hand side and then subtract 1p0 from the overall width by typing -1p0 at the end of the Width dimension – this will give us a 1p0 gutter once it gets divided in half.

Then, put a /2 at the end of the new width, this will divide the rectangle in half.

Finally, make a copy of the frame and move it over to the right. Save your file.

6. Select the middle frame on the left-hand page. In the Transform Panel change the reference point to the bottom and then add 1p0 to the height.

7. Select all of the frames and go to the OBJECT menu > FITTING > FRAME FITTING OPTIONS. Change the fitting to Fill Frame Proportionally, this will ensure that when you place the images into the frames the image will automatically resize to fill the entire frame.

8. Download the images, they are in a zip file and will need to be unzipped, if you are using a MAC it will most likely do this automatically and generate a folder, if you are using a PC, you should be able to double click the file and extract them to a new location. After you unzip them, copy the folder to the location where you are saving your InDesign layout.
9. Back in InDesign, deselect the frames by clicking out on the work area. Then starting from the upper left frame, go to the FILE menu > PLACE (or Cmd/Ctrl + D) and place the images into the content frames as specified in the diagram below. Save your file.

For the next part of this tutorial, you will be adding text. To ensure that the type is formatted the same throughout the document you will make a series of character and paragraph styles, these will also be set up in such a way that paragraphs following other paragraphs will take on specific formatting, a technique referred to as next paragraph.
10. Download these three typefaces (Montserrat Bold, Medium and Regular)and install them. With nothing selected in InDesign go to the Character Styles Panel (WINDOW menu > STYLES > CHARACTER STYLES) and click the New Style Icon. Double Click Character Style 1 and rename it Color Numbers. Click on the Basic Character Formats Tab and change the Font Family to Montserrat and the Font Style to Medium, change the size and leading to 12pts and change the fill color to the default red swatch. Click OK.

11. Create another new character style and rename it Design Principle, change the parameter “based on” to [None]. Under Basic Character Formats change the font family to Montserrat and the Font Style to Bold, change the size and leading to 12pts and the Case to ALL CAPS. Click on the Character Color tab and change the fill color to the Black Swatch. Click OK.

12. Open the Paragraph Styles panel (WINDOW menu > STYLES > PARAGRAPH STYLES) and make a new style. Double click paragraph style 1 and rename it Body Text, in Basic Character Formats change the font family to Montserrat and the Font Style to Regular. Change the size to 8pts and the Leading to 9 pts. Click OK.

13. In this next step, we’ll make a nested style for the titles of each section and also tell InDesign to apply the Body Text style to the following paragraphs. Make another new Paragraph Style and then double-click Paragraph Style 1 and rename it to Sections. In the Based On box, select [No Paragraph Style] and in Next Style select Body Text. Click on the Drop Caps and Nested Style tab, Click on the New Nested Style button and select Color Number as the first style, define the extent of the style by giving it the range of Through (this will include the end character), 1 and / – this will apply the Color Numbers Character Style through the number and the slash mark. Then Click on the New Nested Style button again and have that go Through the rest of the paragraph by selecting End Nested Style. Click OK.

14. Click on this link to open the text for the layout. Copy the first section beginning with 01 and ending with “…you want them to look.” Back in InDesign, before you create a new text frame, click on the Character Panel and select the style None – this will ensure that a character style does not get automatically applied to your pasted text, do the same thing for Paragraph Styles but this time click on Basic Paragraph.

Next, create a text frame in the far left of the middle row on the left-hand page and paste in the text.

Select everything in the text frame, you can either use Cmd/Ctrl + A or you can click 5 times within the frame. Then go to the paragraph style Section and either Ctrl-Click if you are on a MAC (hold down the Ctrl Key as you click) or Right Click on a PC to select Apply “Section” then Next Style.

15. Refer to the image below and place in the text within each frame and then apply the Section paragraph style to each.

16. Copy the title and subheading from the text document and create a large text frame in the empty square in the upper left of the left-hand page. Paste in the text. Change the headline (10 Design Principles) to Montserrat Bold at 32pts high with 34pts of leading, change the subheading to Minion Pro Regular (or Times if Minion is unavailable) at 18pts high with 24pts of leading, change the color to the red swatch.
17. With the text frame selected go to the OBJECT menu > TEXT FRAME OPTIONS, change Align to Bottom and click OK.

18. Finally, with the line tool, draw a series of 1pt horizontal and vertical lines to emphasize the flow of the layout. Draw a horizontal line below the headline that aligns with the center of the Row gutter. Draw one above the color section and one above the alignment section both aligning to the center of the Row gutter.

Draw a line above Negative Space that spans from margin to margin and one above Scale and one above Proximity, all of which should align to the center of the Row gutter. Draw a vertical line between Focus and Contrast that aligns with the center of the column gutter and draw one between Hierarchy and the image and one between Repetition and Balance.

19. Save your File and export it as a PDF using FILE menu > EXPORT. CHnage the range to 2-3 and make sure Spreads are turned on so that you can see the left and right-hand pages together.
