

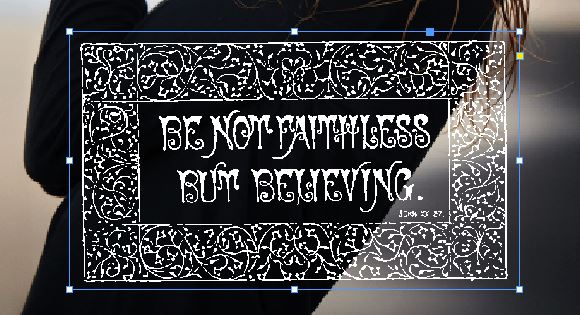
Overlaid graphics in InDesign lend layering and texture to layouts and is great way to mix in disparate elements to create depth and meaning.
Most of the work is the preparation of your file in Photoshop. The end goal is to create a graphic that is one pure color – typically white or black – on a transparent background. For this example we will take a turn of the century graphic pulled from the British Library and convert it to a white overlay for a magazine spread. You can download the original graphic here.
The original graphic is black and white, with a touch of yellow because it was scanned from an old book. In Photoshop we will change the graphic to pure black and white, improve the contrast and then prepare it for our application in InDesign.
1. Open the graphic in Photoshop, at the bottom of the Layers Panel click on the Adjustment Layer Icon (what one of my students charmingly referred to as the black and white cookie) and select Black and White – the defaults are fine for this.

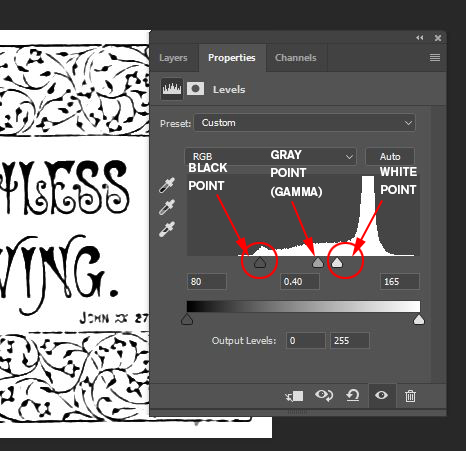
2. Go back to the Adjustment Layer icon and select Levels, in here we will significantly increase the contrast but ensure we don’t lose too much detail. Move the black point towards the right to the first “hill” of level information – this will tell Photoshop that pure black will be remapped to level 80, which is currently the darkest information in the image. Then move the white point to the left of the tall spike of information on the right hand side of the levels scale (somewhere around level 165) , this will make these light gray areas of the image the brightest parts. Balance light and dark by adjusting the Gray Point (gamma), sliding it to the right will make the image a bit darker and will retain more detail, to the left will lose detail, for this example I have adjusted it to .040. NOTE: Different images will vary considerably based on the image origin and the amount of detail.
3. This next step is not always necessary but if you want to ensure you get a overlay with just the color with no haze add a Threshold adjustment. This will change the image to pure black and white with no variation of grays in between. Select Threshold from the Layer Adjustments and use the threshold slider to reveal or hide detail.

4. Add an Invert adjustment layer to the image to make it white on black. We will use this resulting image to create a selection.

5. Select everything (ctrl/cmd + A) or SELECT menu > ALL. Then go to the EDIT menu > COPY MERGED. This will copy the image as if it was flattened to one layer.
6. I like to use this next step for organizational purposes. In the Layers Panel select all of the Adjustments Layers and then click on the Layer Panel menu and select New Group from Layers – this makes it easier to turn all of your adjustments on or off.

7. Open the Channels Panel, select the New Channel Icon and then paste in your merged copy of the graphic into the new channel. This creates am Alpha Channel (selection) where the white information will allow color to pass through and black will block color from passing through.

8. Go to the Layers Panel, turn off the Grouped Layer as well as the Background layer and then go to the SELECT menu > LOAD SELECTION and choose Alpha 1 (the channel you just made)

9. Choose Solid Color from the Adjustment Layer icon and use white as your fill. You will now have a layer of just white pixels on a transparent background. Save your file in the PSD format.

10. Create a new document in InDesign, 1 letter sized page, 1 column with 3p0 as the margin on all sides. Download this image (or use your own) and go to the FILE menu > PLACE and scale it in to fill the entire page.

11. Deselect the image and the go back to FILE menu > PLACE (ctrl/cmd+D) and select your saved PSD graphic, scale it to an appropriate size and rotate it as necessary.
NOTES: to make a black graphic, do the same steps as above in Photoshop but make your solid color black, the same goes for any other colors.
InDesign does feature blending modes such a multiply or screen, so it is entirely possible to take an unprepared graphic and blend it using the InDesign Effects panel. You may get unexpected results where the balcks aren’t dark enough because InDesign by default uses CMYK as its color model and our graphics are typically RGB. You can certainly convert your graphics to CMYK in Photoshop and try blending them directly in InDesign but I think the above steps provides a much better and predictable result.

Create an graphic overlay in InDesign
This entry was posted in Tutorials and tagged InDesign, photoshop tutorials. Bookmark the permalink.